Section 1 – Brewing with Malt Extract
Chapter 1 - A Crash Course in Brewing
What do I do?
If you are like me, you are probably standing in the kitchen wanting to get started. Your malt extract beer kit and equipment are on the counter, and you are wondering how long this will take and what to do first. I would recommend that you read all of Section I—Brewing With Malt Extract. This section will teach you the fundamentals of how to brew beer, so you won’t be confused by incomplete instructions on a beer kit, and you will have an outstanding first batch.
But if you are like me, you probably want to do this right now while you have some time. (It’s going to take about three hours, depending.) So, in this first chapter, I will walk you through the steps necessary to get your first batch bubbling in the fermenter and give you an overview of what you will do to ferment and bottle your beer.
The instructions in this chapter may not explain why you are doing each step or even what you are doing. To understand the What’s and Why’s of brewing, you will need to read the rest of this section. Each of the chapters in Section 1 discuss the brewing steps in detail, giving you the purpose behind each step. You will understand what you are doing, rather than doing it that way just because “that’s what it said . . . .” You will know how long to boil the wort, how to really use hops, why to bother cooling the wort, why to bother rehydrating the yeast, why to wait two weeks before bottling . . . get the picture?
But if you can’t wait, this chapter should see you through. Beer production can be broken down into three main events: Brew Day, Fermentation Week(s), and Bottling Day. If you have questions about terminology, check the Glossary at the back of the book.
Brew Day
Figure 1 shows the usual equipment a beginning brewer might use. Fermenters, brew kettle, funnel, hydrometer, bottle brush, bottle capper, bottle caps, sanitizer, racking cane/siphon, and a bottle. But you don’t need to have all of these things to get started.
Here is a list of the minimum equipment you will need today for this first batch:
Airlock.
Two basic kinds are available: the single-piece or “bubbler,” and the three-piece. They are filled with water or sanitizer to prevent contamination from the outside atmosphere. The three-piece has the advantage of disassembly for cleaning but can inadvertently allow the water to be sucked back into the fermenter, which can happen if the internal pressure drops due to a drop in temperature, or from lifting the plastic bucket. The bubbler type will not suck liquid back inside but is more easily clogged by fermentation gunk and cannot be disassembled for cleaning.
Boil Kettle.
The pot must be able to comfortably hold a minimum of 3 gallons; bigger is better. A 5-gallon aluminum or stainless steel stockpot is a very good choice, because it heats well and won’t scorch or rust. Stainless steel is easier to maintain but is also more expensive and does not conduct heat as well as aluminum.
Fermenter.
The 6-gallon food-grade plastic bucket is recommended for beginners. It is very easy to work with. There are stainless buckets, glass carboys, and fancy plastic fermenters, but the plastic bucket fermenters from the basic equipment kit at your local homebrewing supply shop work just fine.[figure 3 – bucket and carboy]
Glass measuring cup.
The quart-sized or larger measuring cup will quickly become one of your most valuable tools for brewing. The heat-resistant glass ones are best, because they can be used to measure boiling water and are easily sanitized.
Plastic wrap or aluminum foil.
Very handy for keeping jars or fermenters clean and sanitized.
Sanitizer.
Chemical sanitizers are necessary to ensure that yeast are the only microorganisms growing in your beer. Popular no-rinse sanitizers are iodophor and acidic sanitizers like StarSan and Final Step. Common household bleach can also be used, but it can cause off-flavors if not rinsed or used at too strong a concentration.
Stirring spoon.
Food-grade plastic or metal spoon for stirring the wort during the boil.
Thermometer.
Buy a good electronic digital thermometer from a kitchen supply store.
Hydrometer. A hydrometer measures the difference in specific gravity between pure water and water with dissolved sugar. A hydrometer is used to gauge the progress of fermentation by measuring one aspect of it, attenuation. As the fermentation progresses, the yeast consume the sugar and the original wort gravity (OG) decreases towards an anticipated final gravity (FG).
Hydrometer. A hydrometer measures the difference in specific gravity between pure water and water with dissolved sugar. A hydrometer is used to gauge the progress of fermentation by measuring one aspect of it, attenuation. As the fermentation progresses, the yeast consume the sugar and the original wort gravity (OG) decreases towards an anticipated final gravity (FG).
Preparation
1. Assemble ingredients.
Gather the ingredients for the brew. You may have purchased a beer kit at a homebrewing shop, and it will contain the ingredients needed to brew a particular style of beer. A typical kit consists of some liquid or dry malt extract, steeping grains, hops, and a packet of yeast. The specific ingredients will depend on the specific style of beer in the kit. See Figure 5.If you don’t have a kit, then head to a homebrew supply store and buy the ingredients outlined in the American Pale Ale recipe here. You will notice that the recipe calls for various quantities of hops measured in AAUs. AAU stands for alpha acid unit. (See the AAU sidebar and Chapter 5 for more info.)
2. Clean and sanitize.
It may seem strange to the first-time brewer, but probably the most important factor for success in brewing is good cleaning and sanitization. Clean all equipment that will be used during the brew with a mild, unscented dishwashing detergent, and be sure to rinse well. Some equipment will need to be sanitized for use after the boiling stage as described in Table 1 below. You can easily sanitize most of your equipment by filling the fermenter bucket with 5 gallons of water and adding the recommended amount of no-rinse chemical sanitizer. Soak all items that need to be sanitized in this bucket for at least the minimum recommended time. Longer times will not hurt. After soaking, dump the sanitizing solution and cover the fermenter with the lid to keep it sanitary. Place the small spoon and the thermometer in the measuring cup, and cover it with plastic wrap to keep them sanitary. (See Chapter 2 for more info.)
Making Wort
(1½ hours)Now we begin the fun part of the work, creating the wort. Wort is the sweet, amber liquid extracted from malted barley that the yeast will later ferment into beer.
3. Boil the brew water. In the kettle, bring about 3 gallons (11.4 liters) of water to a boil. You will be boiling the extract in this water and concentrating the wort to make 2.5 gallons (10 liters) of beer in the fermenter. Some water will evaporate during the boil, and some will be lost to the trub (hop and protein crud). (See Chapter 7 for more info.)
Note: If your beer kit includes some crushed specialty grain, you will need to steep that in the hot water first, before adding the extract. See Chapter 13 for more info.
4. Add malt extract. When the water in the kettle is boiling, turn off the stove and stir in the malt extract. Be sure the extract is completely dissolved (if your malt extract is the dry variety, make sure there are no clumps; if the extract is syrup, make sure that none is stuck to the bottom of the pot). See Figure 9 - dissolving the extract. Here is a decision point: How long do you need to boil the wort? The boil time for extract beers depends on three things: pasteurizing the extract, waiting for the “hot break” (see Step 6), and boiling for hop additions. If you are using hopped extract without any added hops, then you may not need to boil very long (5-10 minutes for pastuerization), because the hot break has already occurred during the extract manufacturing process. If you are using hopped extract but adding flavoring or aroma hops, then you will want to boil it for 15 to 30 minutes. If you are using unhopped extract, then you will need to add multiple hop additions for bittering, flavor, and aroma, and you will boil for an hour. (See Chapters 3, 5, and 7 for more info.) 5. Add hops. If you are using unhopped extract, add the first (bittering) hop addition and begin timing the hour-long boil. (See Chapter 5 for more info.) 6. Watch for boilovers. As the wort boils, foam will form on the surface. This foam will persist until the wort goes through the “hot break” stage. The wort will easily boil over during this foaming stage, especially when hops are first added, so stay close by and stir frequently. Blow on it, and turn the heat down if it begins to boil over. Put a few copper pennies into the pot to help prevent boilovers. (See Chapter 7 for more info.)[figure 10 – boiling wort] 7. Add finishing hops (optional). If you are using unhopped malt extract or want to add more character to hopped extract, add finishing hops during the last 15 minutes of the boil. (See Chapter 5 for more info.)8. Cool the wort. After the boil, the wort must be cooled to yeast-pitching temperature (64 to 70° F, 18 to 21° C). You can do this quickly by using a wort chiller (See Appendix D), or slowly by simply covering it with the lid while still hot and allowing it to cool overnight. Do not add yeast until the wort is cool!
Fermentation Week(s)
The science of fermentation is discussed in Chapter 8. Chapter 9 walks you through the application of that science, so that you too will be able to amaze your family and friends with a bubbling airlock!
1. Pour the cooled wort.
Pour the cooled wort into the fermentation bucket aggressively, so that it splashes and churns in the bucket. This action adds the oxygen yeast need for growth. For best results, pour some back into the boiling pot, and then pour it into the fermenter again. Do this two or three times. This is the only time during the brewing process that you want the beer to be aerated or exposed to oxygen. All other transfers should be done quietly, using a sanitized siphon, and with very little disturbance in the flow and minimal contact with the air. If you had added hops during the boil, you can remove them during this step by pouring the wort into the fermenter through a strainer. It is not necessary to remove the hops but it makes for less trub in the fermenter.Figure 12—Pouring the chilled wort
2. Check your Wort Gravity. Pour a sample of wort into the hydrometer jar and insert the hydrometer. It should float to near the 1.050 mark. Don’t forget to adjust the reading for the temperature. (See Appendix A.) If it is a few points high or low, it doesn’t really matter but it is good information to have. Yeast will generally ferment wort about 75%, leaving 25% behind, so in this case with 50 points, you would expect the final gravity after fermentation to be about 1.012, plus or minus a couple points. Don’t worry too much about this at this stage of your brewing education.[figure 13 – pitching the yeast] 3. Pitch the yeast. Carefully open the yeast packet with a clean pair of scissors and pour it into the fermentation bucket. In the 20th century, it was common practice to rehydrate the yeast before pitching, but yeast health and packaging has greatly improved in the last 50 years, so rehydration is not necessary.[figure 14 – Secure Lid and Airlock and place in a constant temperature area.] 4. Store the fermenter. Put the lid tightly on the fermenter, and carry the bucket to a secure location where it will be undisturbed for two weeks. Choose a location that has a stable temperature of 65 to 70° F (18 to 21° C). A warmer temperature of 75° F (24° C) is OK, but above 80° F (26° C) the flavor of the beer will be affected. As soon as you have finished moving it, insert the airlock and fill the airlock with clean water or sanitizer solution. 5. Leave it alone! After about 24 hours, the airlock will be bubbling steadily, the exciting evidence of fermentation. The fermentation will proceed like this for two to four days, depending on the conditions of your fermentation. The activity will decrease as the yeast consume most of the malt sugars, although fermentation and maturation will continue after the bubbling diminishes. Leave the beer in the fermenter for a total of two weeks. 6. Clean up. Now is the time to wash out your kettle and other equipment. Only use mild unscented dishwashing detergents or the cleaners recommended in Chapter 2, and rinse well.
2. Check your Wort Gravity. Pour a sample of wort into the hydrometer jar and insert the hydrometer. It should float to near the 1.050 mark. Don’t forget to adjust the reading for the temperature. (See Appendix A.) If it is a few points high or low, it doesn’t really matter but it is good information to have. Yeast will generally ferment wort about 75%, leaving 25% behind, so in this case with 50 points, you would expect the final gravity after fermentation to be about 1.012, plus or minus a couple points. Don’t worry too much about this at this stage of your brewing education.[figure 13 – pitching the yeast] 3. Pitch the yeast. Carefully open the yeast packet with a clean pair of scissors and pour it into the fermentation bucket. In the 20th century, it was common practice to rehydrate the yeast before pitching, but yeast health and packaging has greatly improved in the last 50 years, so rehydration is not necessary.[figure 14 – Secure Lid and Airlock and place in a constant temperature area.] 4. Store the fermenter. Put the lid tightly on the fermenter, and carry the bucket to a secure location where it will be undisturbed for two weeks. Choose a location that has a stable temperature of 65 to 70° F (18 to 21° C). A warmer temperature of 75° F (24° C) is OK, but above 80° F (26° C) the flavor of the beer will be affected. As soon as you have finished moving it, insert the airlock and fill the airlock with clean water or sanitizer solution. 5. Leave it alone! After about 24 hours, the airlock will be bubbling steadily, the exciting evidence of fermentation. The fermentation will proceed like this for two to four days, depending on the conditions of your fermentation. The activity will decrease as the yeast consume most of the malt sugars, although fermentation and maturation will continue after the bubbling diminishes. Leave the beer in the fermenter for a total of two weeks. 6. Clean up. Now is the time to wash out your kettle and other equipment. Only use mild unscented dishwashing detergents or the cleaners recommended in Chapter 2, and rinse well.
Bottling Day
The second big day in your life as a homebrewer comes two weeks later, after fermentation is complete. Everything outlined below is thoroughly discussed in Chapter 11.
To bottle your beer, you will need:
Bottles.
You will need 24 clean 12-ounce bottles for a 2.5-gallon (10 liter) batch. Twist-offs do not recap well and are more prone to breaking. Larger bottles will also work if they use a standard bottle cap.
Bottle capper.
Two styles are available: hand cappers and bench cappers. Either kind will work well.
Bottle caps.
Both standard or oxygen-absorbing crown caps are available – either is fine.
Bottle brush.
A long-handled nylon bristle brush is necessary for the first, hardcore cleaning of used bottles.
Siphon.
Available in several configurations, it usually consists of clear plastic tubing with a racking cane and optional bottle filler.
Racking cane.
Rigid plastic tube with sediment standoff to help leave the trub behind when siphoning.Bottle filler. Rigid plastic (or metal) tube, often with a spring-loaded valve at the tip, for filling bottles.
Bottling bucket (optional).
A 6-gallon food-grade plastic pail with attached spigot and fill-tube. The finished beer is racked into this for priming prior to bottling. Racking into the bottling bucket allows clearer beer with less sediment in the bottle. The spigot is used instead of the bottle filler, allowing greater control of the fill level and no hassles with a siphon during bottling.
1. Prepare your bottles.
Thoroughly clean and sanitize the bottles before use. If you are using old bottles, check them inside for dirt or mold deposits. They may need to be scrubbed with a bottle brush to get them really clean. Always clean first, then sanitize.
2. Prepare your bottle caps.
The bottle caps should at least be clean before you use them, and it doesn’t hurt to sanitize them too. Some brewers use swing-top (Grolsch-style) bottles. The ceramic part of the swing-tops can be sanitized along with the bottles. The rubber seals can be sanitized like the bottle caps.
3. Prepare your priming sugar.
We add a priming solution just before bottling to provide carbonation to the beer in the bottle. Boil about 75 grams of table sugar in 1 cup of water in the microwave oven. Cover the cup or bowl with plastic wrap and allow it to cool. Note: 70-80 grams of sugar will work for this batch size. 75g is about 75 milliliters or 1/3 cup. [figure 18 – racking from fermenter to bottling bucket]
4. Combine beer and priming sugar.
The best method for preparing the beer and priming sugar solution is to use a separate container the same size as your fermenter as a “bottling bucket.” Clean and sanitize it and gently pour the priming solution into it. Next, siphon the beer from the fermenter into the bottling bucket. Don’t pour the beer into the bucket, and don’t let the beer splash as you siphon it in. Instead, put the end of the siphon under the surface of the beer as it fills. The swirling motion of the beer as it enters the bucket will be sufficient to mix the priming solution into the beer evenly without aeration.
See Figure 19.
If you don’t have a bottling bucket, you can gently pour the priming solution into the fermenter and gently stir it. Allow the sediment in the fermenter to settle for 15 to 30 minutes before proceeding. You can fill the bottles using the bottle filler attachment on your siphon.
See Figure 20.
5. Bottle. Carefully fill the bottles with the primed beer, place a sanitized bottle cap on each bottle, and crimp it using the bottle capper. At this stage it is helpful to have a friend operate the capper, while you fill the bottles. 6. Store the bottles. Place the capped bottles out of direct sunlight in a warm room (room temperature – 65 to 75° F, 18 to 24° C). The bottles will take about two weeks to carbonate. The bottles will have a thin layer of yeast on the bottom.
5. Bottle. Carefully fill the bottles with the primed beer, place a sanitized bottle cap on each bottle, and crimp it using the bottle capper. At this stage it is helpful to have a friend operate the capper, while you fill the bottles. 6. Store the bottles. Place the capped bottles out of direct sunlight in a warm room (room temperature – 65 to 75° F, 18 to 24° C). The bottles will take about two weeks to carbonate. The bottles will have a thin layer of yeast on the bottom.
Serving Day
At last, you get to sample the fruit of your labors. It has been about a month since Brew Day, and you are ready to open your first bottle and taste the wonderful beer that you created. During the past two weeks, the yeast still swimming around in the beer have consumed the priming sugar, creating just enough carbon dioxide to carbonate your beer perfectly.OK, so maybe you couldn’t wait that long, and you already opened a bottle. You may have noticed the beer wasn’t fully carbonated, or that it seemed carbonated but the bubbles had no staying power. You may have also noticed a “green” flavor. That flavor is the sign of a young beer. The two-week “conditioning” period not only adds carbonation but also gives the beer flavors more time to meld and balance out.
1. Chill your beer.
The bottled beer does not need to be stored cold. It will keep for about six months, depending on how well you managed to avoid exposure to oxygen during the last stage of fermentation and the bottling process. You will probably want to chill it before serving, however. The optimal temperature for serving beer depends on the style, varying from 40 to 55° F (4 to 12° C). In general, the darker the beer, the warmer you serve it, although this is a matter of preference.
2. Pouring your beer.
To pour the beer without getting yeast in your glass, tip the bottle slowly to avoid disturbing the yeast layer on the bottom of the bottle as you pour. With practice, you will be able to pour everything but the last quarter-inch of beer without getting any yeast in your glass.
3. Savor the flavor.
Finally, take a deep drink and savor the flavor of the beer you created. Take time to evaluate the aroma, the flavor, its bitterness qualities, its sweetness, and the level of carbonation. These observations are your first steps to beer appreciation and designing your own recipes.
This is only the beginning...
If you want to learn more about brewing beer—how it works, why it works, and how to have fun creating your own recipes and trying advanced techniques—then I encourage you to keep reading. The next chapters in this book will lead you through extract brewing again, but with more explanation. The chapters describe the ingredients in greater detail and will teach you the science behind the steps so it will all make sense.

Figure 1 - Basic Equipment Kit

Figure 2 - Bubbler and Three Piece type Airlocks
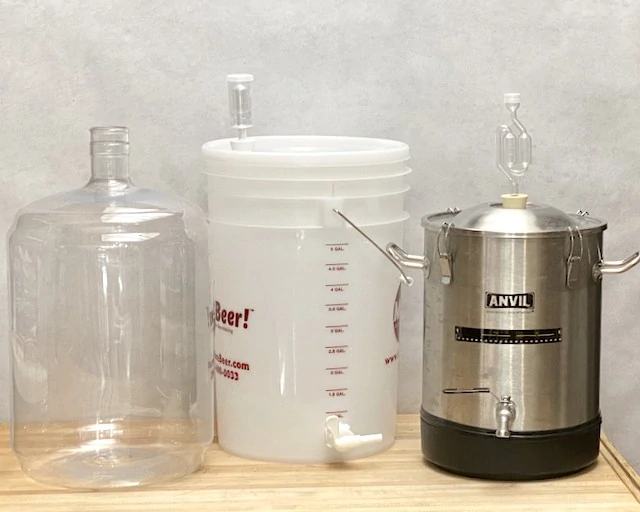
Figure 3 - Various fermenter types.
Recipe for American Pale Ale
OG = 1.050, 30 IBUs Ingredients for a 2.5 gallon (10 liter) batch 3 lbs. (1.4 kg) pale dry malt extract 6 AAUs of bittering hops (any variety) For example, 0.5 oz. (14g) of 12% AA Nugget, or 0.75 oz. (21g) of 8% AA Northern Brewer 5 AAUs of finishing hops (Cascade or other) For example, 1 oz. (28g) of 5% Cascade or 1.25 oz. (36g) of 4% Liberty 1 packet of dry ale yeast
Alpha Acid Unit (AAU)
AAU is a measurement unit for hops, which add a balancing bitterness to the malt in beer. The actual unit for measuring bitterness in beer is the IBU (International Bittering Unit), for which the AAU is a constituent. The AAU is obtained by multiplying the alpha acid rating of the hop (a percentage value) by the weight (ounces) that you intend to use. For example, 2 ounces of a 6% alpha acid hop equals 12 AAUs.
Every package of hops you buy will list the hop’s alpha acid rating. To figure out how much of a hop you will need for this recipe, just divide the AAU target by the alpha acid percentage on your hops. For example, 12 AAUs divided by 12% alpha equals 1 ounce; 12 AAUs divided by 8% alpha equals 1.5 ounces.
Every package of hops you buy will list the hop’s alpha acid rating. To figure out how much of a hop you will need for this recipe, just divide the AAU target by the alpha acid percentage on your hops. For example, 12 AAUs divided by 12% alpha equals 1 ounce; 12 AAUs divided by 8% alpha equals 1.5 ounces.
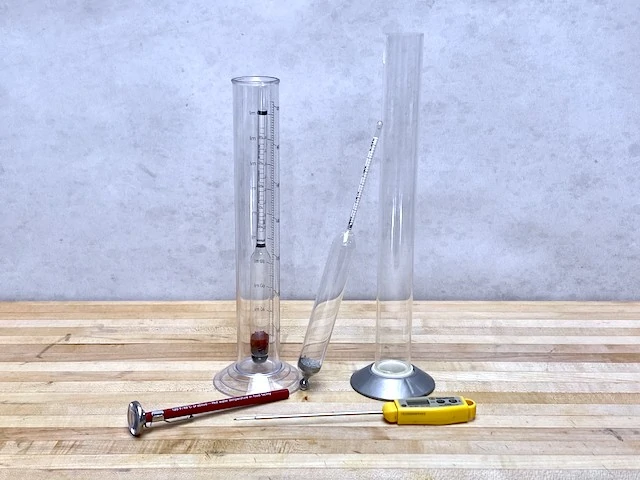
Figure 4 - Hydrometers and Thermometers
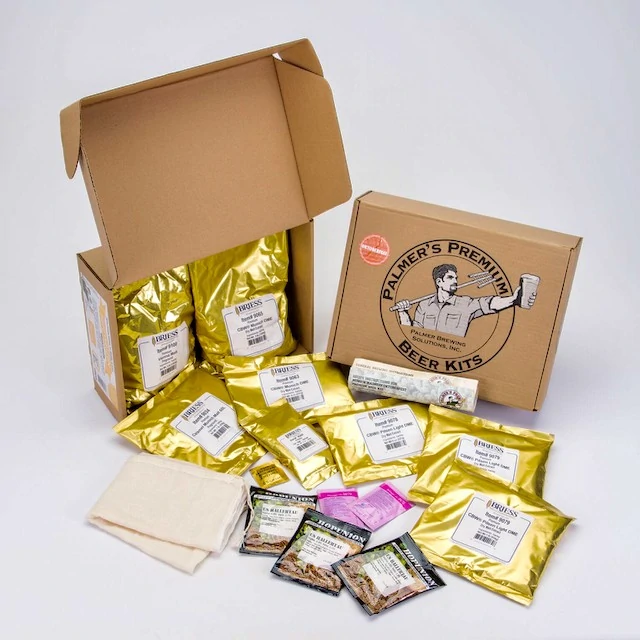
Figure 5 – Atypical Beer Kit
Table 1 - Cleaning and Sanitizing Checklist
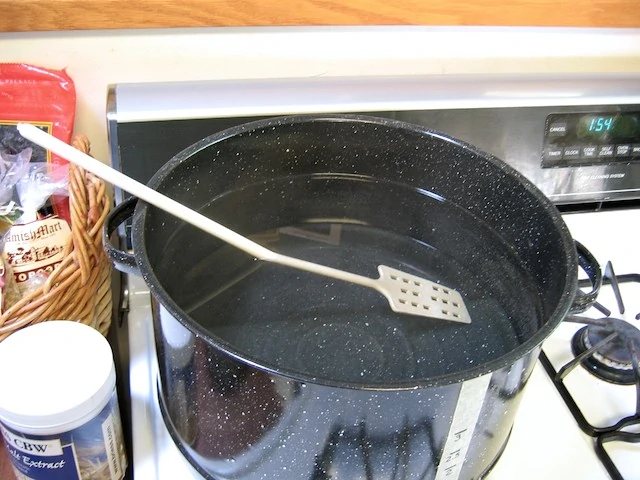
Figure 6 - Start boiling the water and get your ingredients ready. Do you have yeast?

Figure 7 – Steeping the Crushed Specialty Grains before adding the malt extract.
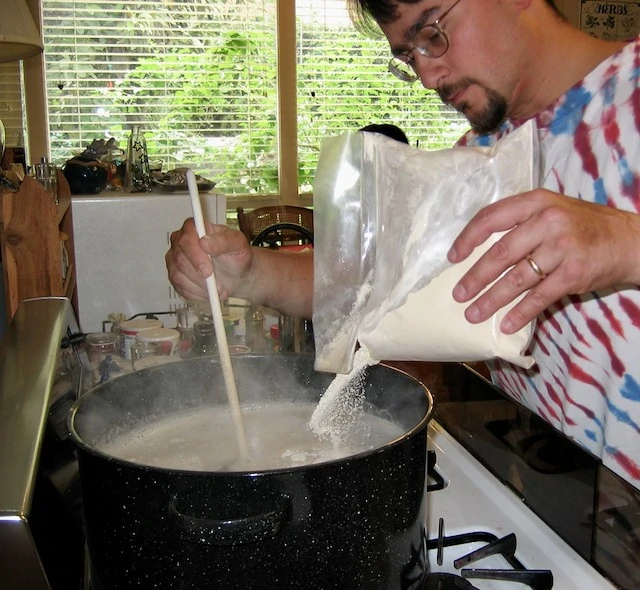
Figure 9 – Adding the dry malt extract.
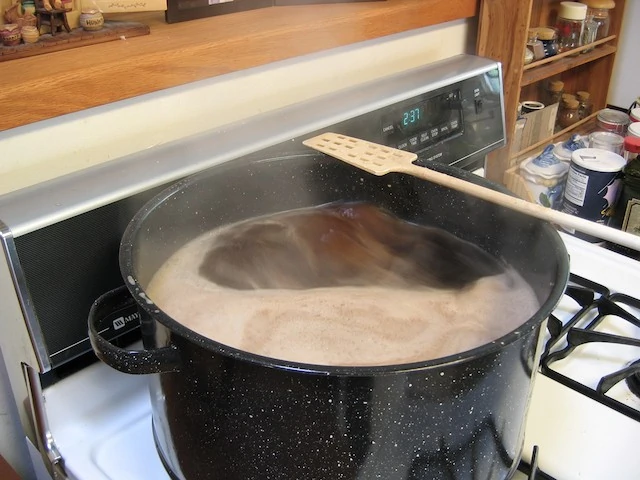
Figure 10 – The wort is boiling and foam arises prior to hot break.
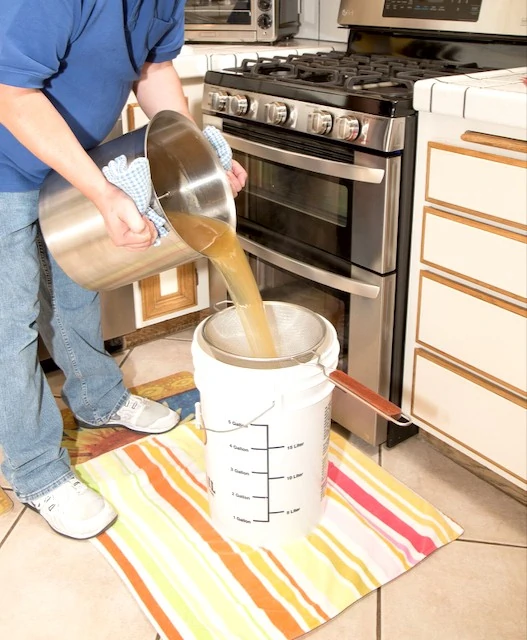
Figure 12 – Pouring the chilled wort for aeration.
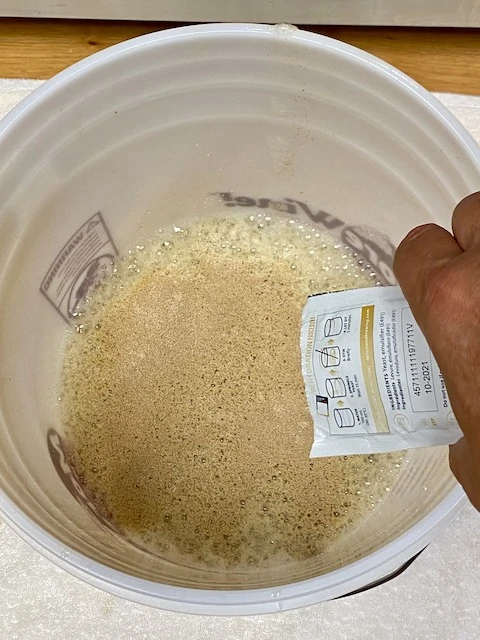
Figure 13 – Pitching the yeast onto surface of chilled wort.

Figure 14 – Secure the lid and airlock and place in a cool consistent area.
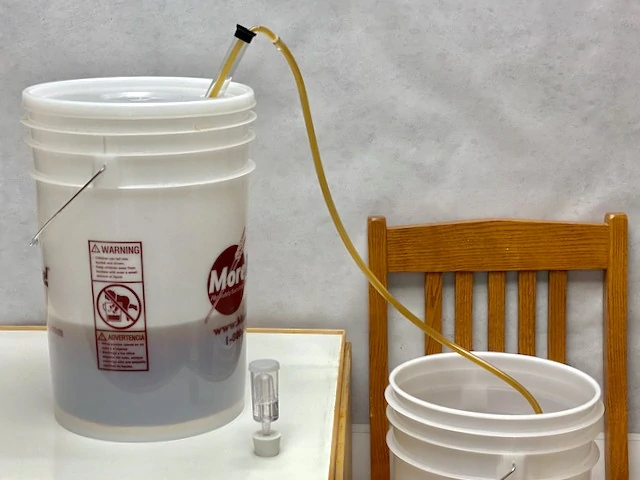
Figure 18 – Racking from fermentor to bottling bucket.
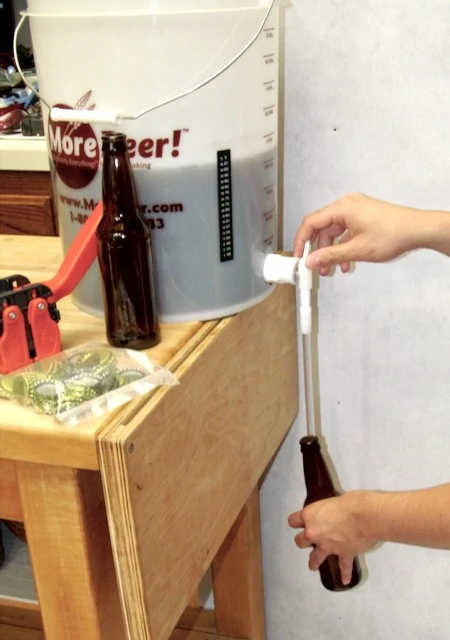
Figure 19 – Bottling using the Bottling Bucket.
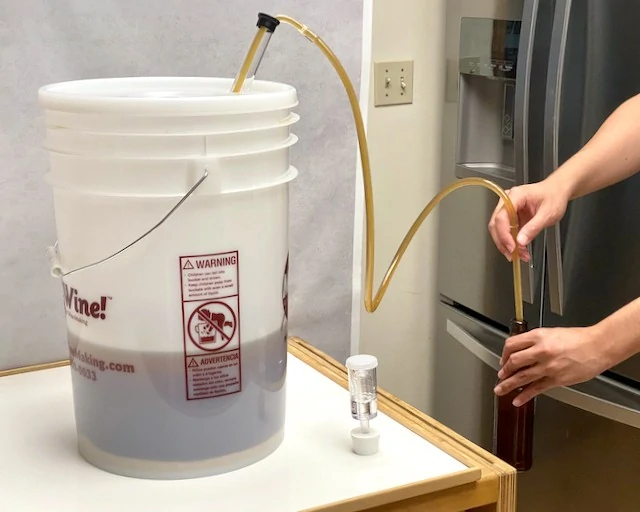
Figure 20 – Bottling using the siphon.

Figure 21 – Savor your success!