Section 1 – Brewing with Malt Extract
Chapter 6 - Yeast
What is Yeast?
There was a time when the role of yeast in brewing was unknown. In the days of the Vikings, each family had their own brewing stick that they used for stirring the wort. These brewing sticks were family heirlooms because it was the use of that stick that guaranteed that the beer would turn out right. Obviously, those sticks retained the family yeast culture.
The German Beer Purity Law of 1516—The Reinheitsgebot, listed the only allowable materials for brewing as malt, hops, and water. With the scientific recognition of yeast and its function in the late 1860’s by Louis Pasteur, the law had to be amended.
Brewer’s Yeast (Saccharomyces cerevisiae) is a type of fungus. It reproduces asexually by budding – splitting off little daughter cells. Yeast are unusual in that they can live and grow both with or without oxygen. Most micro-organisms can only do one or the other. Yeast can live without oxygen by a process that we refer to as fermentation. The yeast cells take in simple sugars like glucose and maltose and produce carbon dioxide and alcohol as waste products.
In addition to ethyl alcohol and carbon dioxide, yeast produce many other compounds, including esters, fusel alcohols, ketones, various phenolics and fatty acids. Esters are the molecular compound responsible for the fruity notes in beer, phenols cause the spicy notes, and in combination with chlorine (chlorophenols)—medicinal notes. Diacetyl is a ketone compound that can be beneficial in limited amounts. It gives a butter or butterscotch note to the flavor profile of a beer and is desired to a degree in heavier Pale Ales, Scotch Ales and Stouts. Unfortunately, diacetyl tends to be unstable and can take on stale, raunchy tones due to oxidation as the beer ages. This is particularly true for light lagers, where the presence of diacetyl is considered to be a flaw. Fusel alcohols are heavier molecular weight alcohols and are thought to be a major contributor to hangovers. These alcohols also have low taste thresholds and are readily apparent as “sharp” notes. Fatty acids, although they take part in the chemical reactions that produce the desired compounds, also tend to oxidize in old beers and produce cardboard-like and soapy off-flavors.
Yeast Terminology
The following are some terms that are used to describe yeast behavior.
Attenuation
This term is usually given as a percentage to describe the percent of malt sugar that is converted by the yeast strain to ethanol and CO2. Most yeast strains attenuate in the range of 67–77%. More specifically, this range is the “Apparent” attenuation. The apparent attenuation is determined by comparing the Original and Final gravities of the beer. A 1.040 OG that ferments to a 1.010 FG would have an apparent attenuation of 75%.
(From FG = OG - (OG x %) => % att. = (OG-FG)/OG)
The “Real” attenuation is less. Pure ethanol has a gravity of about 0.800. If you had a 1.040 OG beer and got 100% real attenuation, the resulting specific gravity would be about 0.991 (corresponding to about 5% alcohol by weight). The apparent attenuation of this beer would be 122%. The apparent attenuation of a yeast strain will vary depending on the types of sugars in the wort that the yeast is fermenting. Thus the number quoted for a particular yeast is an average. For purposes of discussion, apparent attenuation is ranked as low, medium, and high by the following percentages: • 67-70% = Low • 71-74% = Medium • 75-78% = HighNote: Attenuation is not entirely up to the yeast. The fermentability of the wort, as determined by the brewer, sets the limits to which a particular yeast may work.
Flocculation
This term describes how fast or how well a yeast clumps together and settles to the bottom of the fermentor after fermentation is complete. Different yeast strains clump differently and will settle faster or slower. Some yeasts practically “paint” themselves to the bottom of the fermentor while others are ready to swirl up if you so much as sneeze. Highly flocculant yeasts can sometimes settle out before the fermentation is finished, leaving higher than normal levels of diacetyl or even leftover fermentable sugars. Pitching an adequate amount of healthy yeast with adequate aeration is the best solution to this potential problem.
Lag Time
This term refers to the amount of time that passes from when the yeast is pitched to when the airlock starts bubbling vigorously on the fermentor. A long lagtime (more than 24 hours) may indicate that the wort was poorly aerated, not enough yeast was pitched and/or that the yeast was initially in poor shape.
Pitching Rate
This term is the number of yeast cells to add per volume of wort. The most often cited pitching rate is 1 billion cells per 1 liter wort•1 °Plato, which equates to about 0.95 billion cells per 1 gallon wort•1 point (1.001) of gravity. This rate is for re-pitching of used yeast. For fresh yeast i.e., from a starter, the pitching rate is about half that. For lagers the rate needs to be higher. See Tables 8 and 9 for more details on pitching rates and starter quantities.
Yeast Types
There are two main types of yeast: ale and lager. Ale yeasts are referred to as top-fermenting because much of the fermentation action takes place at the top of the fermentor, while lager yeasts would seem to prefer the bottom. While many of today’s strains like to confound this generalization, there is one important difference, and that is temperature. Ale yeasts like warmer temperatures 65-75°F (18-24°C), going dormant below about 55°F (12°C), while lager yeasts will happily work at 45-55°F (7-13°C). There are hybrid strains that work well at in between temperatures (55-60°F, 13-16°C), and there are high temperature ale strains, known as Kveik, that only ferment well at 90-105°F (32-40°C).
Yeast Forms
Yeast come in two main product forms, dry and liquid. (There is also another form, available as pure cultures on petri dishes or slants, which is basically liquid yeast with a low cell count.) Dry yeasts are select, hardy strains that have been dehydrated for storability.
Dry yeast is convenient because the packets provide a lot of viable yeast cells, they can be stored for extended periods of time and they can be prepared quickly on brewing day. It is common to use one or two packets (11-22 grams) of dried yeast for a typical five gallon batch. This amount of yeast provides enough active yeast cells to ensure a strong fermentation. Dry yeast can be stored for up to two years (preferably in the refrigerator), but the packets do degrade with time. This is one of the pitfalls with brewing from a no-name yeast packet taped to the top of a can of malt extract. Don’t use it. They are probably more than a year old and may not be very viable. It is better to buy another packet or two of a reputable brewer’s yeast that has been kept in the refrigerator at the brewshop. Some leading and reliable brands of dry yeast are Fermentis Yeast, Lallemand, Muntons, and Mangrove Jack.
Dry ale yeasts make good beer, but the rigor of the dehydration process limits the number of different strains that are available. A few dry lager yeasts do exist, and they produce very clean beers. The only thing missing with dry yeast is more variety, which is where liquid yeasts come in. There are more strains of yeast are available in liquid form than in dry.
Liquid yeast typically comes in a sealed pouches and generally contain at least 100 billion cells. These pitchable quantities do not require a starter for the lower gravity styles (~4% ABV). Higher gravity styles require more yeast, either by pitching multiple packages or by pitching the pouch to a yeast starter (mini fermentation) to build the cell count. More on that later in this chapter.
Yeast Strains
There are many different strains of brewer’s yeast available nowadays and each strain produces a different flavor profile. Some Belgian strains produce fruity esters that smell like bananas and cherries, some German strains produce phenols that smell strongly of cloves. Those two examples are rather special, most yeasts are not that dominating. But it illustrates how much the choice of yeast can determine the taste of the beer. In fact, one of the main differences between different beer styles is the strain of yeast that is used. Many major breweries have their own strain of yeast. These yeast strains have evolved with the style of beer being made, particularly if that brewery was a founder of a style, such as Anchor Steam®. In fact, yeast readily adapts and evolves to specific brewery conditions, so two breweries producing the same style of beer with the same yeast strain will actually have different yeast cultivars that produce unique beers. Yeast companies have collected these different yeasts from around the world and package them for home brewers.
Dry Yeast strains
There are many different strains of brewer’s yeast available nowadays and each strain produces a different flavor profile. Some Belgian strains produce fruity esters that smell like bananas and cherries, some German strains produce phenols that smell strongly of cloves. Those two examples are rather special, most yeasts are not that dominating. But it illustrates how much the choice of yeast can determine the taste of the beer. In fact, one of the main differences between different beer styles is the strain of yeast that is used. Many major breweries have their own strain of yeast. These yeast strains have evolved with the style of beer being made, particularly if that brewery was a founder of a style, such as Anchor Steam®. In fact, yeast readily adapts and evolves to specific brewery conditions, so two breweries producing the same style of beer with the same yeast strain will actually have different yeast cultivars that produce unique beers. Yeast companies have collected these different yeasts from around the world and package them for home brewers.
Liquid Yeast strains
There are a lot of liquid yeasts to choose from and in order to keep this simple I will just describe them by general strain. This is not to say that all of the cultivars of a type are the same; within a strain there will be several cultivars that have different characteristics from what is listed here. You will find that each company’s offering will be subtly different due to the conditions under which it was sampled, stored, and grown. You may find that you prefer one company’s cultivar over another’s. Detailed descriptions of each company’s cultivar will be available at your brewshop or on the company’s website. This is an incomplete list because new strains are being added to the market all the time.
General Purpose Ale Yeasts
American, Californian, or Chico Ale
A very “clean” tasting yeast, producing less esters than other types of ale yeast. Good for just about any type of ale. This strain is usually associated with Sierra Nevada Pale Ale. High attenuation, medium flocculation. Suggested fermentation temperature range is 60-72°F (15-22°C).
Australian Ale
This all-purpose strain typically comes from Thos. Cooper & Sons of Adelaide, and produces a very complex, woody, and fruity beer. Medium attenuation, medium flocculation. Great for pale ales, brown ales and porters. Suggested fermentation temperature range is 65-75°F (18-24°C).
British Ale
This strain typically comes from Whitbread Brewing Co., and ferments crisp, slightly tart, and fruity. More maltiness is evident than with the American ale yeast. Medium attenuation, medium flocculation. Suggested fermentation temperature range is 64-72°F (18-22°C).
Irish Ale
The slight residual diacetyl is great for stouts. It is clean, smooth, soft and full bodied. Very nice for any cold-weather ale, at its best in stouts and Scotch ales. Medium flocculation, medium attenuation. Suggested fermentation temperature range is 62-72°F (16-22°C).
Specialty Ale Yeasts
Belgian Ale
Lots of fruity esters (banana, spice), and can be tart. Very good for Belgian ales, Dubbels and Tripels. This is actually a group of strains, and each particular strain will have its own personality. In general, Medium flocculation, high attenuation. Suggested fermentation temperature ranges are 65-75°F (18-24°C).
European Ale
This ale yeast typically comes from Wissenschaftliche in Munich. A full bodied complex strain that finishes very malty. Produces a dense rocky head during fermentation. It’s clean and malty, especially well suited to Altbier. Reportedly a slow starter (longer lag times). High flocculation, low attenuation. Suggested fermentation temperature range is 62-72°F (17-22°C).
German Altbier
Ferments dry and crisp leaving a good balance of sweetness and tartness. Produces an extremely rocky head and ferments well down to 55°F. A good choice for Alt style beers. Low flocculation, high attenuation. Suggested fermentation temperature range is 55-68°F (13-20°C).
Kolsch Ale
An old German style of beer that is more lager-like in character. Nice maltiness without as much fruit character as other ales. Some sulfur notes that disappear with aging. Low flocculation, high attenuation. Suggested fermentation temperature range is 56-70°F (13-21°C).
London Ale
Complex, woody, eatery. Could be from one of the several renowned London breweries. Slight diacetyl. Medium flocculation, medium attenuation. Suggested fermentation temperature range is 62-72°F (17-22°C).
Wheat Beer YeastsBelgian Wit (White) Beer
Mild phenolic character for the classic Belgian Wit beer style. Tart and fruity. Low flocculation, Medium attenuation. Suggested fermentation temperature range is 65-75°F (18-24°C).
Weizen
Produces the distinctive clove and spice character of wheat beers. The low flocculation of this yeast leaves the beer cloudy (Hefe-Weizen) but it’s smooth flavor makes it an integral part of a true unfiltered wheat beer. Low flocculation, High attenuation. Suggested fermentation temperature range is 65-75°F (18-24°C).
Lager Yeast
American Lager
Very versatile for most lager styles. Gives a clean malt flavor. Some cultivars have an almost green-apple tartness. Medium flocculation, high attenuation. Suggested primary fermentation temperature range is 48-56°F (9-12°C).
Bavarian Lager
Lager yeast strain used by many German breweries. Rich flavor, full bodied, malty and clean. This is an excellent general purpose yeast for lager brewing. Medium flocculation, High attenuation. Suggested primary fermentation temperature range is 46-58°F (8-14°C).
Bohemian Lager
Ferments clean and malty, giving a rich residual maltiness in high gravity pilsners. Very suitable for Vienna and Oktoberfest Styles. Probably the most popular lager yeast strain. Medium flocculation, Medium attenuation. Suggested primary fermentation temperature range is 48-58°F (9-14°C).
California Lager
Warm fermenting bottom cropping strain, ferments well to 62°F, having some of the fruitiness of an ale while keeping lager characteristics. Malty profile, High flocculation, Medium attenuation. This is the yeast that is used for Steam-type beers. Suggested primary fermentation temperature range is 58-68°F (14-20°C).
Czech Pils Yeast
Classic dry finish with rich maltiness. Good choice for pilsners and bock beers. Sulfur produced during fermentation dissipates with conditioning. Medium flocculation, Medium attenuation. Suggested primary fermentation temperature range is 50-58°F (11-14°C).
Danish Lager Yeast
Rich, yet crisp and dry. Soft, light profile which accentuates hop characteristics. Low flocculation, High attenuation. Suggested primary fermentation temperature range is 46-57°F (8-13°C).
Munich Lager Yeast
A classic lager yeast that is smooth, malty, well rounded, and accentuates hop flavor. It is reported to be prone to producing diacetyl, so use a diacetyl rest. Medium flocculation, high attenuation. Suggested primary fermentation temperature range is 48-56°F (9-12°C).
Determining Your Pitching Rate
There are many factors that combine to determine just how much yeast you should pitch to your wort to produce a good fermentation, and thus a good beer. The most obvious factors are wort gravity and fermentation temperature. If you intend to brew a low gravity mild ale, you don’t need a lot of yeast to do the job. With typical levels of nutrients and aeration, a relatively low number of yeast will easily reproduce enough cells to ferment that wort very well. On the other hand, if you are going to brew a high gravity doppelbock lager, then you are going to need to pitch a lot more yeast because the cooler fermentation temperature will decrease the activity level and reproduction rate, and more total yeast mass will be needed to adequately ferment the higher gravity wort. As a general rule, you need to pitch more yeast for higher gravity worts and you need to pitch more yeast for cooler fermentation temperatures. Recommended pitching rates for lager beers will be given in Chapter 10. Recommended ale pitching rate ranges for different wort gravities are given in Table 8.
The number of active yeast cells in yeast packages can be found on the manufacturer’s websites. Most dry yeast packets have a cell density of about 6 billion per gram, so you will get 50-70 billion cells in a single packet, which is good for five gallons of most of the common beer styles. The White Labs pitchable tubes and the 125 ml Wyeast Activator pouches deliver about 100 billion. Wyeast also markets a 50 ml Propagation pouch with 35 billion cells that is designed to be pitched to a starter. So, look at the recipe and plan your pitching rates accordingly. You may want to pitch two packets of yeast or use a yeast starter to build up the cell count more. Yeast starter procedures are discussed later in this chapter.
Table 9 gives estimated final yeast cell counts as a function of initial yeast cell count and volume of starter wort. In other words, if you pitch 60 billion cells from a dry yeast packet to 2 quarts of starter wort, of 1.040 gravity, you can conservatively expect to produce 173 billion cells. These growth estimates were calculated from a general model developed by Wyeast Laboratories based on several growth experiments conducted across several yeast strains.
Yeast Nutritional Needs
Yeast cannot live on sugar alone. In Chapter 3—What is Malt Extract? I described the types of sugars that make up a typical beer wort, and how yeast typically utilize them. Yeast also need minerals, nitrogen, and amino and fatty acids to enable them to live and grow. The primary source for these building blocks are minerals in the water and the free amino nitrogen (FAN), lipids, and minerals from the malted barley. Refined sugars like table sugar, corn sugar and honey do not contain any of these nutrients. An all-malt extract should have all the nutrition that the yeast will need for a good fermentation. But if you are brewing a single can type kit that instructs you to add 2 pounds of table sugar, you will probably want to add some yeast nutrients to assure a good fermentation.
From a yeast cell’s point of view, its purpose in life is to grow, eat, and reproduce. Yeast can do all this with or without oxygen, but using oxygen makes the processes easier for the cell. Yeast use oxygen in the biosynthesis of the compounds that make up their cell membranes that allow them to process sugars for food and grow. Without oxygen, yeast cannot synthesize sterols very well, which means that they can’t grow more cell membrane, which means that they can’t bud, and reproduction diminishes. Therefore, to ensure a good fermentation, we need to provide the yeast with sufficient oxygen to allow them to grow quickly and reproduce when they are first pitched to the fermentor. Once they have reproduced to sufficient numbers, we can let them get on with turning our wort into beer. The importance of oxygen in yeast growth will be emphasized again in Chapter 8.
If you use ion-exchanged softened water for brewing, the water may not have adequate calcium, magnesium, and zinc for some of the yeast’s metabolic processes. Magnesium plays a vital role in cellular metabolism and its function can be inhibited by a preponderance of calcium in the wort. Brewers adding calcium salts for water chemistry adjustment may want to include magnesium salts as part of the addition if they experience fermentation problems. Usually the wort supplies all the necessary mineral requirements of the yeast, except for zinc, which is often deficient, or in a non-assimilable form. Additions of zinc can greatly improve the cell count and vigor of the starter, but adding too much will cause the yeast to produce excessive by-products and cause off-flavors. Zinc acts as a catalyst and tends to carry over into the succeeding generation—therefore it is probably better to add it to either the starter or the main wort but not both. The nutrient pouches in the Wyeast smack-packs already contain zinc in addition to other nutrients. For best performance, zinc levels should be between 0.1-0.3 mg/l, with 0.5 mg/l being maximum. If you experience stuck fermentations or low attenuation, and you have eliminated other variables such as: temperature, low pitching rate, poor aeration, poor FAN, age, etc., then lack of necessary minerals may be a significant factor.
Nutritional Supplements
You will see four types of yeast nutrients on the market that can supplement a wort that is high in refined sugars or adjuncts.
Di-ammonium Phosphate—
This is strictly a nitrogen supplement that can take the place of a lack of FAN.
Yeast Hulls—
This is essentially dead yeast, the carcasses of which act as agglomeration sites and contain some useful residual lipids.
Yeast Nutrient or Energizer—
The name can vary, but the intent is a mixture of di-ammonium phosphate, yeast hulls, biotin, vitamins, and minerals (Zn, Mn, Mg). These mixtures are a more complete dietary supplement for the yeast and I recommend it.
ServomycesTM—
This product from Lallemand is similar to yeast hulls but differs by having a useful amount of rapidly assimilable zinc, which is an essential enzyme co-factor for yeast health. This product falls within the provisions of the Rheinheitsgebot.
Oxygen
Yeast need 8-16 ppm of oxygen (depending on the strain) to synthesize sterols and unsaturated fatty acids for cell membrane biosynthesis. Without aeration, fermentations tend to be underattenuated because oxygen availability is a limiting factor for yeast growth—the yeast stop budding when sterol levels for cell membrane growth become depleted. Higher gravity worts need more yeast for proper fermentation, and thus need more oxygen, but the higher gravity makes it more difficult to dissolve oxygen in the first place. Boiling the wort drives out the dissolved oxygen normally present, so aeration of some sort is needed prior to fermentation. Proper aeration of the wort can be accomplished several ways: • shaking the container, e.g. the starter jar (about 8 ppm)• pouring the cooled wort back and forth from the boiling pot into the fermentor (about 8 ppm)• using a bronze or stainless steel airstone with an aquarium air pump and using it to bubble air into the fermentor for a half hour (about 8 ppm, sustained). • using an airstone with an oxygen tank and bubbling for about 5 minutes (about 25 ppm).
For the beginning brewer, using dry yeast, I recommend the simplest methods of shaking the starter and pouring the wort. Pouring is also effective if you are doing a partial boil and adding water to the fermentor to make up the total volume. Instead of pouring the wort, you can just pour the water back and forth to another sanitized pot prior to adding the wort.
Using an air pump and airstone to bubble air into the fermentor is effective and saves you from lifting a heavy fermentor. The saturation point of oxygen from the air in wort is 8ppm. Most yeast strains require 8-16 ppm of oxygen for adequate growth and activity, but that requirement also depends on the pitching rate and the size of the wort. The yeast will process the oxygen quickly, generally in less than an hour. An air pump and airstone will reach 8 ppm for 5 gallons in about 5 minutes, but I recommend aerating for a half hour, to make sure that the yeast get all that they need. The only precaution you need to take, other than sanitizing the airstone and hose, is to be sure that the air going into the fermentor is not carrying any mold spores or dust-borne bacteria. An in-line filter is recommended to prevent airborne contamination from reaching the wort. One type is a sterile medical syringe filter and these can be purchased at hospital pharmacies or at your local brewshop. An alternative, build-it-yourself bacterial filter is a tube filled with moist cotton balls. See Figure 40. The cotton should be changed after each use.
You can also buy small oxygen tanks that will deliver more oxygen faster to the wort. Pure oxygen has a wort saturation point of 40 ppm so only a relatively short time is needed compared to ordinary air. But, I have had better fermentations using air rather than using pure oxygen. Interestingly enough, that also seems to be the consensus of Ron Cooper and The Strand Brewers club of Redondo Beach, California, in the For Geeks Only section of the March/April 2004 issue of Zymurgy magazine. In the article “Oxygen and Hydrogen Peroxide in Beer”, they brewed 23 batches of various beers, using shaking/pouring, air pumps, oxygen tank, and hydrogen peroxide. While they could not make any definitive conclusions, competition results for the various beers indicated that the oxygen tank beers “seemed thinner or washed out, like smaller beers.” Malt and hop flavors seemed reduced. This perception was even greater in the hydrogen peroxide treated batch (5ml per 5 gallons), where a 47 IBU IPA was judged, “thin and estery”, “not much hop”, “sweet and insipid.” All of the beers had fermented well with good attenuation; the shortcomings may be due to an oxidized wort, as opposed to an aerated one.
On the other hand, nearly all commercial breweries use pure O2 that is injected into the line as the wort is pumped from the whirlpool to the fermentor. The key is to provide a sufficient amount of oxygen and other nutrients. Obviously, there is room for further experimentation and discussion in this area.
Aeration is Good, Oxidation is Bad
The health and vigor of the yeast is the most significant factor in determining the quality of a fermentation, and oxygen can be the most significant factor in determining these qualities of the yeast. Oxygen is both your friend and your enemy. It is important to understand when which is which. You should not aerate when the wort is hot, or even warm. Aeration of hot wort will cause the oxygen to chemically bind to various wort compounds. Over time, these compounds will break down, freeing atomic oxygen back into the beer where it can oxidize the fatty acids and alcohols, producing off-flavors and aromas like wet cardboard or sherry.
Oxidation of your wort can happen in several ways. The first is by splashing or aerating the wort while it is hot. This problem is called hot-side aeration or HSA. There is a lot of ongoing debate on whether HAS is a real problem in practice, because several studies have demonstrated that a vigorous fermentation of a HSA wort will still produce a high quality shelf stable beer. Over-oxygenating with pure O2 can be a problem as well, even if done cold. High levels of oxygen will cause the yeast to reproduce and ferment more quickly and generally leads to higher levels of fusel alcohols. You want to oxygenate, but you want to control it. More is not necessarily better.In addition, if oxygen is introduced after primary fermentation has started, it may cause the yeast to produce more of the early fermentation byproducts, like acetohydroxy acids. However, some strains of yeast respond very well to “open” fermentations (where the fermentor is open to the air) without producing off-flavors. But even for those yeast strains, aeration after fermentation is complete can lead to staling. When you rack to a secondary fermentor or to the bottling bucket, it is very important to prevent gurgling or splashing. Keep the siphon flowing smoothly by placing the outlet of the siphon hose below the surface of the rising beer. Decrease the difference in height between the two containers when you begin. This will slow the siphon rate at first and prevent turbulence and aeration until the outlet is beneath the surface.
To summarize, you want to pitch a sufficient amount of healthy yeast, preferably grown in a starter that matches your intended fermentation conditions. You want to cool the wort to fermentation temperature and then aerate the wort to provide the oxygen that the yeast need to grow and reproduce. Then you want to protect the beer from oxygen after fermentation to prevent oxidation and staling.

Figure 37 - Aerial view of yeast ranch.

Figure 38 - Budding yeast cells. (daughter cells)
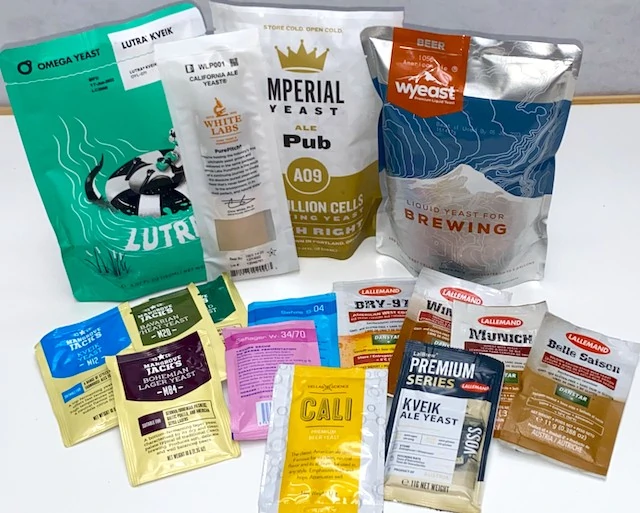
Figure 39 - Various Liquid and Dry yeast products.
Pitching Rate vs. Esters
The pitching rate also affects the aroma/flavor character of the beer. Lower pitching rates tend to produce more aromatics and esters than higher pitching rates. A lower pitching rate will encourage more yeast reproduction due to the perceived abundance of resources. The yeast will reproduce until the total yeast mass reaches the limit for what the wort resources can support. More reproduction generally means more synthesis of new cell membrane and increased production of an intracellular enzyme called Alcohol Acetyl Transferase (AAT), which regulates the fluidity of the membrane and is believed to play a major role in the esterification of fatty acids (e.g. Acetyl CoA) by the yeast. The production of AAT is also encouraged by environmental stresses on the yeast, such as temperature, pH, and nutrient levels. At higher pitching rates, less reproduction will occur to bring the total yeast mass up to wort’s resource limit, and less cell membrane and AAT synthesis occurs. The production of esters by the yeast is complicated, and the role of AAT is still a theory, but it is consistent with empirical observations and measurements. The bottom line is that lower pitching rates seem to produce more aromatics and esters than higher pitching rates.
Author's Note, 2025: Ester production is thought to be a means for yeast cells to detoxify their environment, taking two hazardous waste compounds (typically a short chain fatty acid and an alcohol) and combining them into a relatively non-hazardous waste product. Stressful fermentations produce more waste products, and thereby, more esters. A normal healthy fermentation will produce a normal satisfactory amount of esters. Too much ester tends to taste like bubble gum.

Figure 40 - Aeration kit from aquarium air pump.
Table 8 - Pitching Rates for Ales
Table 9 – Est. Final Cell Count by Initial Count and Starter Size
The starter wort is assumed to be 1.040 with 8 ppm of dissolved oxygen. The final count is given per quart and (per liter) of wort.
.jpeg)
Figure 44 - Adding dry malt extract to make the starter wort.
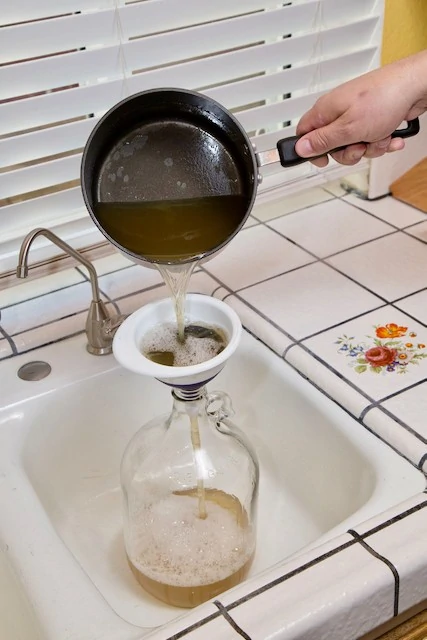
Figure 45 – Pouring the cooled starter wort in the starter jar.

Figure 46 – Pitching the yeast to the starter.
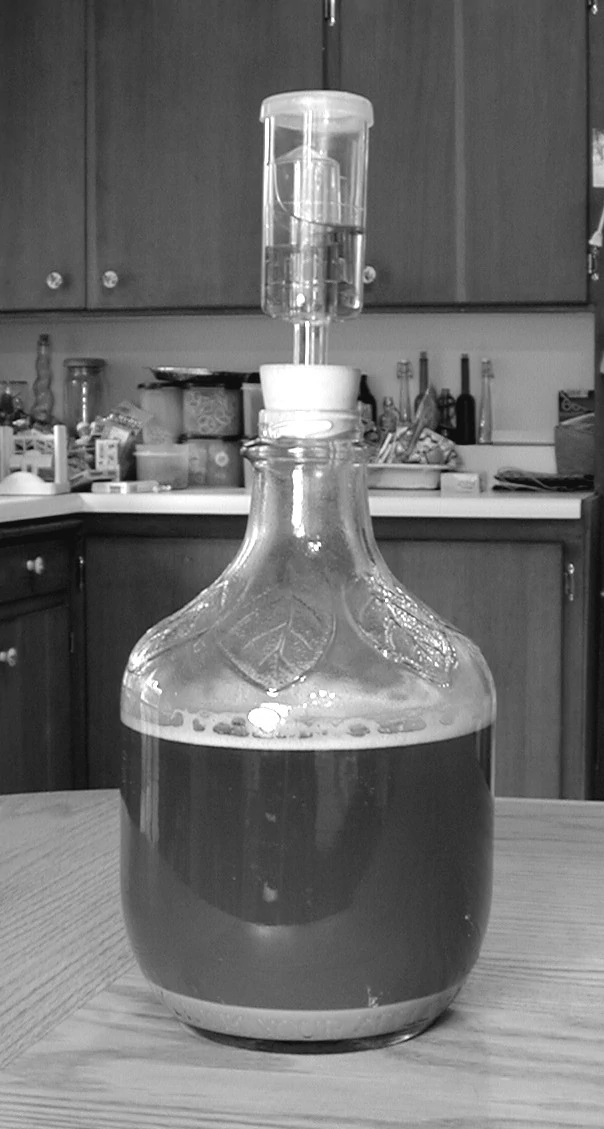
Figure 47 – The starter has finished fermenting and a larger yeast layer can be seen on the bottom. (couldn't find the original color photo.)
Preparing a Yeast Starter
Liquid yeast is generally regarded as being superior to dry yeast for having more variety of stains available and a less generic flavor profile than dry. Liquid yeast allows for greater tailoring of the beer to a particular style. There are two kinds of liquid yeast packaging. One is the pitchable pouch that you just pour in, and the other is the smack pack, which contains an inner bubble of yeast nutrient. You smack the pouch to burst the inner bubble and release the nutrients to the yeast. The yeast ferment these nutrients and swell the pouch, acting as a built-in viability test.
However, liquid yeast has a shorter shelf life than dry yeast, and it often needs a starter to perk it back up to full health or to increase the overall cell count prior to pitching to your batch. You could simply pitch two or three packages for stronger worts, but that can get expensive. A yeast starter can help you increase your cell counts with a mini fermentation.
Making the Starter
Step 1—Boil the starter wort.
Boil 1 quart (~1 liter) of water and stir 4 oz or 115g of DME. This will produce a starter of about 1.040 OG. Boil this for 10 minutes, adding a little bit of hops if you want to. Put the lid on the pan for the last couple minutes, turn off the stove and let it sit while you prepare for the next step. Adding a quarter teaspoon of yeast nutrient (vitamins, minerals, biotin, and dead yeast cells) to the starter wort is always advisable to ensure good growth. It is available from your brewshop. Step 2—Cool the starter wort.Fill the kitchen sink with a couple inches of cold water. Take the covered pot and set it in the water, moving it around to speed the cooling. When the pot feels cool, about 80°F or less, pour the wort into a sanitized glass jar or something similar. Pour all of the wort in, even the sediment. This sediment consists of proteins and lipids, which are actually beneficial for yeast growth at this stage. [figure 45 – pouring wort]Step 3—Pour the starter wort into the starter jar.Ideally, the starter wort temperature should be the same as what you plan the fermentation temperature to be. This allows the yeast to get acclimated to working at that temperature. If the yeast is started warmer and then pitched to a cooler fermentation environment, it may be shocked or stunned by the change in temperature and may take a couple days to regain normal activity.[figure 46 – adding yeast to starter]Step 4—Sanitize the pouch and pour the yeast into the jar.Add the yeast into the jar. Two quart juice or cider bottles work well, and the opening is often the right size to accept an airlock and rubber stopper. Cover the top of the jar or bottle with plastic wrap and the lid.Shake the starter vigorously to aerate it. Remove and discard the plastic wrap, insert an airlock and put it somewhere out of direct sunlight. If you don’t have an airlock that will fit, don’t worry. Instead, put a clean piece of plastic wrap over the jar or bottle and secure it loosely with a rubber band. This way the escaping carbon dioxide will be able to vent without exposing the starter to airborne bacteria. [figure 47 – finished starter with yeast layer]Step 5—This starter has been built up twice and a substantial yeast layer can be seen on the bottom. Most any type of jar can be used for starters: mayonnaise, juice, or cider all work well. The top can be covered with plastic wrap, aluminum foil, or an airlock. Good sanitation is paramount! During the next day or two some foaming or an increase in the white yeast layer on the bottom should be evident. These small wort starters can ferment quickly so don’t be surprised if you missed the activity. When the starter has cleared and the yeast have settled to the bottom it is ready to pitch to the fermentor, although it will keep for 2-3 days without any problems.
The starter process may be repeated several times to provide more yeast to ensure an even stronger fermentation. In fact, a general rule is that the stronger the beer (more fermentables /higher gravity), the more yeast you should pitch. For strong beers and barleywines, at least 1 cup of yeast slurry or 1 gallon of yeast starter should be pitched to ensure that there will be enough active yeast to finish the fermentation before they are overwhelmed by the rising alcohol level. For more moderate strength beers (1.060 gravity) a 1–1.5 quart starter is sufficient. One recommendation when pitching a large starter is to chill the starter overnight in the refrigerator to settle all the yeast. Then the unpleasant tasting starter beer can be poured off so only the yeast slurry will be pitched. This helps prevent the taste of the starter from influencing the taste of the final beer if the starter volume was large, i.e., 1⁄2 gallon.You don’t need to warm up the starter before pitching to your fermentor. Many homebrewers report excellent performance and short lagtimes from pitching the starter right from the refrigerator.
When is my Starter Ready to Pitch?
A yeast starter is ready to pitch when it has attained high krausen (full activity), or after it has settled out, and for about a day or two after, depending on the temperature. There is an approximately 18 hour window after activity has peaked that you should wait while it builds up its trehelose and glycogen reserves before pitching it to your wort. Once it has built up those reserves and gone dormant you have a couple days of grace while its vitality is still near optimum. Colder conditions allow the yeast to be stored longer before pitching. Yeast starters that have settled out and sat at room temperature for more than a couple days should be fed fresh wort and allowed to attain high krausen before pitching.
A key condition to this recommendation is that the composition of the starter wort and the main wort must be very similar if the starter is pitched at or near peak activity. Why? Because the yeast in the starter wort have produced a specific set of enzymes for that wort’s sugar profile. If those yeast are then pitched to a different wort, with a different relative percentage of sugars, the yeast will be impaired and the fermentation may be affected. Kind of like trying to change boats in mid-stream. This is especially true for starter worts made from extract that includes refined sugars, such as from a beer kit that is tailored to a light bodied style like Blonde Ale. Yeast that has been eating a lot of sucrose, glucose, and fructose will quit making the enzyme that allows it to eat maltose—the main sugar of brewer’s wort.
If you make your starter using a malt extract that includes refined sugar, it is better to wait until the yeast have finished fermenting and settled out before pitching to the main wort. Why?
Because towards the end of fermentation, yeast build up their glycogen and trehalose reserves; kind of like a bear storing fat for the winter. Glycogen and trehalose are two carbohydrates that act as food reserves for the yeast cell. Yeast slowly feed off these reserves when other food is not present, and use this food extensively to fuel the synthesis of essential lipids, sterols, and unsaturated fatty acids when pitched to an oxygenated wort. (Yeast will rapidly deplete their glycogen reserves when exposed to oxygen.) While glycogen can be likened to the fat that a bear stores for winter, the other component, trehalose, acts more like the bear’s heavy fur coat. Trehalose seems to get built up on both the inside and outside of the cell membrane, and is generally believed to make the membrane structure more robust and more resistant to environmental stresses. By allowing the yeast starter fermentation to go to completion, these reserves are built up, and upon pitching, the yeast starts out with a ready fuel supply and a clean slate to better adapt it to the new wort. As noted earlier, though, these same reserves are used by the yeast while in hibernation, so if the yeast are left too long before pitching, the reserves may be depleted and should be replenished with a fresh starter wort fermentation before use.
Using Yeast from Commercial Beers
There are many quality microbrewed beers on the market that are bottle conditioned, i.e. naturally carbonated and unfiltered, much the same as homebrewed beers are. The yeast layer from a bottle conditioned beer can be harvested and grown just like the yeast from a liquid yeast packet. This is a common practice among homebrewers because it allows for the use of some special yeast strains in homebrew that would not otherwise be available. This method can be used for cloning some of the specialty styles, such as Belgian Wit, Trappist Ales, or Saison. The only caveat to be aware of is that sometimes brewers will bottle beer with a secondary yeast strain that carbonates the beer more effectively than the primary (and perhaps tired) yeast. It’s hard to know which breweries may be doing this for which products; a Google search and a Reddit thread may be able to tell you about a particular beer you are interested in.Harvesting yeast from a bottle-conditioned beer is quite simple. 1. After opening the bottle, thoroughly clean the bottle neck and opening with sanitizer to prevent bacterial contamination.2. Simply pour the beer into a glass as you normally would, leaving the yeast layer on the bottom intact. 3. Swirl up the sediment with the beer remaining in the bottle and pour the yeast sediment into a prepared starter solution as described in the previous section—Preparing a Liquid Yeast Starter.
For best results, add the sediment from 2-3 bottles and be sure to use the freshest beer you can find. The starter should behave the same as any other liquid yeast pack starter, though it may take longer to build due to the smaller amount of yeast that you start out with. In fact, you may not notice any activity in the starter for the first couple wort additions until the amount of yeast builds to higher levels. Add more wort as necessary to build the yeast slurry to pitching level. Be sure to taste, or at least sniff, the starter beer to check for contamination. It should be beer-like and not funky.Note: Some beers are packaged with a different yeast than the one used for primary fermentation. Beers that have a high alcohol content are not good candidates because the yeast is severely weakened and has probably mutated by the time you try to culture it.
Support Your Local Micro
In addition, if you have a quality brewpub or microbrewery nearby, the brewers are often happy to provide yeast to homebrewers. A good brewery produces a lot more yeast than they can use and it is usually free of contamination. I keep a spare, sanitized, plastic pint container in the car in case I am visiting a micro and am able to talk to the brewers. (I know what you are thinking, “What are the odds that I will be at a brewpub when they are brewing?” Sometimes it requires several visits a week to even those odds, but that’s life.) If they don’t have any yeast available at the moment, they will usually suggest you come back the next day/week when they are transferring, and will give you some then. The advantage to obtaining yeast this way is that you usually get a cup or more of slurry which is more than enough to ferment a 5 gallon batch. You are virtually assured of a vigorous, healthy fermentation, without the fuss of preparing a yeast starter a few days beforehand. The yeast will stay viable for a couple weeks if kept in the refrigerator. But remember, you may want to replenish the yeast’s glycogen and trehelose reserves, as described in When Is My Starter Ready To Pitch, if the yeast is stored for a long time.
Simple Yeast Ranching
Each batch of beer you brew is a good source of yeast for a future batch. The best way to obtain yeast is to skim it from the krausen of a currently fermenting beer. To do this, you will need to be using a bucket type fermentor and first skim off the green/brown hop and protein compounds with a sanitized spoon early in the primary phase. As the creamy white krausen builds up, you can skim this fresh yeast off with a sanitized spoon and transfer it to a sanitized jar. Fill the jar with cooled boiled water and place it in the refrigerator. The lack of nutrients in the water will cause the yeast to kind of “hibernate” and it will keep for up to a couple months. You should pitch this yeast to a starter after storage to re-vitalize it.The only drawback to the above harvesting method is the contamination risk for the current batch. Experienced brewers with good sanitation practices can harvest yeast that way without much risk, but for newer brewers it is probably better to collect the yeast after the fermentation is complete. You can collect yeast from either the bottom of the primary or secondary fermentor. The yeast from the primary is healthier, but usually has a lot of trub mixed in. If you obtain yeast from the secondary, it will have smaller amounts of trub mixed in and will be easier to separate. However, you need to be aware that if you repitch yeast harvested from the secondary several times in succession, you will tend to select the less flocculent cells of the population, and future beers will be slow to clarify. But, if you only repitch once or twice, it is not a big deal. I myself usually harvest yeast from the secondary.If you harvest yeast from the primary fermentor, you will need to separate the yeast from all the trub that is mixed in. Professional brewers most often do this by “acid washing” the yeast—using acid to lower the pH to about 2.5 so that bacteria is inhibited and using whirlpool methods to separate the heavier trub from the lighter yeast. But acid washing tends to inhibit the yeast too, and is not strictly necessary. You can simply use chilled boiled* water and two sanitized jars to separate the healthy yeast (white) away from the majority of the trub. 1. After racking the beer, swirl up the yeast layer on the bottom and pour some into a large sanitized jar (such as a mayonnaise jar).2. Gently pour in some cold, boiled water and swirl it up to get all the yeast and trub in suspension.3. Let the jar sit for a minute or three to allow most of the trub to settle to the bottom. Gently pour the cloudy water, containing suspended yeast, into another sanitized jar. Discard the dark trub.4. Add some more water and repeat this procedure until you are left with a substantially light-colored yeast suspension and only a thin brown layer of dead yeast and trub on the bottom of the jar. When the yeast finally settles, you will have a white yeast layer on top of a thin trub layer.5. You should be able to store the jar in the refrigerator for several weeks. The yeast will turn brown as it ages. Discard it once it turns the color of peanut butter. Eventually the yeast will autolyze and die as its nutritional reserves are used up.Pitch the yeast to a starter before using to restore its vitality. If the starter smells wrong—rancid, rubbery, etc., the yeast may be contaminated. The dominant smell of a starter should be a yeasty smell, but sulfur smells are not necessarily bad, especially with lager yeast strains. Note: You want to use boiled water for two reasons:• For sanitation.• To avoid exposing the yeast to dissolved oxygen which would cause the yeast to deplete their glycogen reserves before storage.